Creating an Expression Web Dynamic Web Templates - DWT's
Now that you have created your page, and you know that it validates you can save it as a Dynamic Web Template or DWT for short. There is a FREE Ebook available on Dynamic Web Templates written and made available by Tina Clarke. I encourage you to download and use Expression Web DWT EBook
What is a Dynamic Web Template?
A Dynamic Web Template - DWT - is an HTML/XHTML based master copy of a web page that you create to contain formatting and page elements such as text, graphics, page layout, styles, and regions of a web page that can be modified. You can attach a Dynamic Web Template to the pages that are part of a web site, and that template defines the layout for those pages. A website can contain more than one DWT.
Why it’s a good idea to use a DWT?
One of the most important concepts of website design is to maintain a consistent look and feel for your site. Using a DWT makes this possible. As a webmaster you should attempt to provide:
- Consistent navigation throughout your site
- Consistent look throughout the site
- Provide basic pages such as a Sitemap, Contact, About and Search pages. Your visitor should be able to reach your home page from any page on the site.
- Provide copyright information and a disclaimer or terms of use page as well as a Privacy Policy. These are quite often found in the footer of a page.
Creating a Dynamic Web Template - DWT
Step 1: Before you can create a Dynamic Web Template you have to have a template to work with. Create your template as a HTML or XHTML document with all of the elements of the page that will be part of every page on your site - masthead, site navigation, footer. Make sure it also includes any meta tags you want to use. Save the template and make sure it validates BEFORE you create your DWT. If you followed all of the previous steps, you will have created your basic template.
Step 2: With your page open in EW > File > Save As > Save as type - dropdown button > Select Dynamic Web Template from the dropdown > Give the file a name file-name.dwt > Click Save

Click the thumbnail for a larger image.
Step 3: The DWT won't do you much good without editable regions - regions that can be changed on the pages the DWT is attached to. Once you save the page as a DWT, one editable region is created for the doctitle. You will need to create additional editable regions, for the content area, your keywords and description meta tags.

NOTE: The editable region name must be all one word and in lower case. You can call it anything you want, however relating it to the placement on the page helps keep the various regions straight.
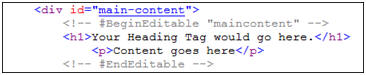
Step 4: To create an editable region for your keyword and description meta tags, Copy and Paste the just before your description meta tag. Copy and Paste the tag right after the keywords meta tag. Double click the 2nd occurrence of the doctitle tag and change it to headsection.
![]()
Click the thumbnail for a larger image.
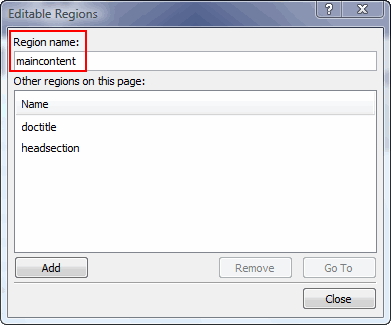
Step 5: Select all the text in the main text area of your DWT page > Right click with your mouse > Select manage editable regions from the drop down > In the region name box type maincontent > Click the add button > maincontent is added to your editable regions > Click the close button.
Click thumbnail for larger image
NOTE: In Code View, make sure the editable region is INSIDE you <div id="main-content"> or you will wipe out the div tag when you attach the DWT to your content pages.
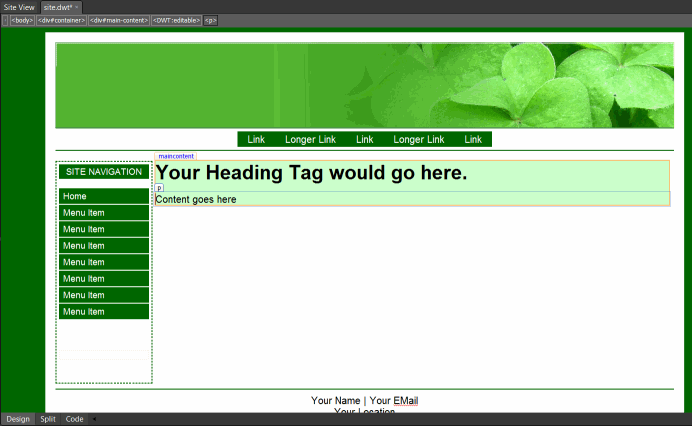
You can now see that the text on your DWT page is surrounded by a yellow border and titled maincontent
Click thumbnail for larger image
Step 6: If your navigation is going to change from section to section, you will need to create an editable region for that area too. Once finished, save your page.
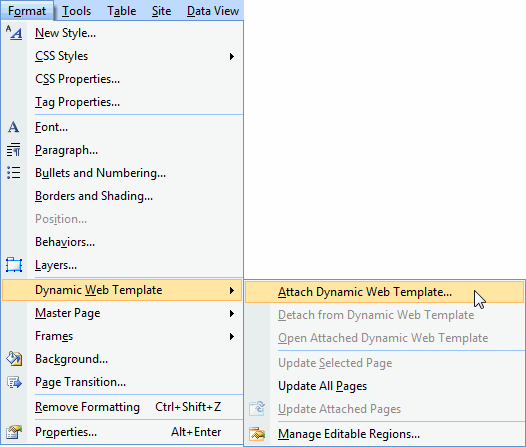
Step 7: Now that you have created your DWT, you need to check and make sure it works correctly. Click on the new page icon > A new blank page is created for you > Click on Format from the top menu bar > Select Dynamic Web Template > attach dynamic web template
Click the thumbnail for a larger image.
Click on site.dwt from the file list, and then click OK. Expression Web will tell you that 1 file has been updated. Expression Web has attached the DWT to your blank page. If everything looks OK, your DWT is ready to use.
Now that you have created your DWT, you can begin developing the content for your site.
How to Create Web Pages from the Dynamic Web Template
Step 1: From the 'Folder List' view, locate your DWT and right click on your the file. Choose "New From Dynamic Web Template." A new page will be created for you.
Step 2: Save the file and name it. Remember, to use no spaces in your file name. If you want to use multiple words for the file name, separate them with hyphens.
Example: file-name.html
As you develop your content, remember to save your page often 'just in case.' It can be very frustrating to have worked for an hour or two and all of a sudden something happens and your work is gone. Be sure and validate your pages as you go along.
Once you have finished adding your content, it will be time to publish your site to the web.
NEXT STEP:
Publishing Your Web Site with Expression Web 3.0 or 4.0 ![]()

Copyright © 2010 Pat Geary of Expression Web Tutorials and Templates, All Rights Reserved
Revised August 2010
Expression Web 4.0 Tutorials 2nd Edition from Install to Publish, a FREE EBook by Pat Geary.

Expression Web has a group on Facebook. If you are a FB user, come join us.

Disclosure: This is an affiliate link, which means that if you visit Bluehost.com through this link and purchase this product, I’ll get a commission.

April 2007 - April 2013